Roof Leaking Where It Meets a Wall? Check These 4 Things
By the Professional Roofers team
Updated 2026 · Independent cost guide
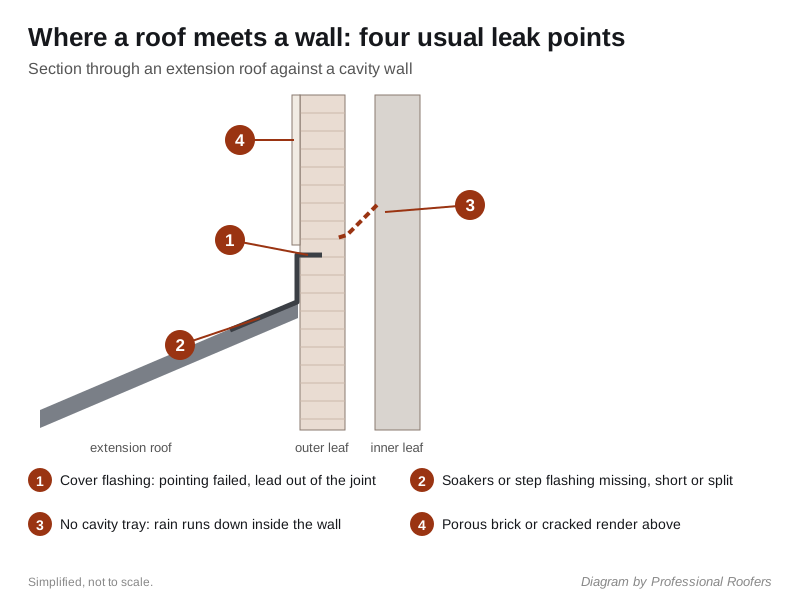
A roof leaking where the roof meets a wall is one of the commonest leaks on British houses, because every extension, lean-to, porch and bay roof has that junction, and every one depends on a few small details being right. The water usually gets in at one of four places: the cover flashing has come out of the mortar joint, the soakers or step flashing under the tiles are missing or too short, there is no cavity tray in the wall above, or the brick or render above the flashing is letting rain straight through it. The last two are the ones most roofers miss, because they are not roof problems at all.
This page shows how to work out which you have, mostly from the ground and from inside, and what the right repair looks like.
How the junction is meant to work
Where a pitched roof runs up against a wall (an “abutment”), the gap between tiles and brickwork is closed by lead in two layers:
- Soakers: small pieces of lead slipped between each course of plain tiles or slates, with one edge turned up the wall. They are hidden under the tiles. Interlocking concrete tiles do not use soakers; they rely on the flashing dressed over the tile profile.
- Step or cover flashing: lead fixed into the mortar joints of the wall and dressed down over the soakers or tiles, so that water running down the wall is thrown onto the roof.
The lead must be tucked into the wall properly. A guide to lead weathering at walls published by Building Conservation says flashings should be turned into the wall at least 25mm, held with lead wedges at no more than 450mm centres, and fitted in lengths of no more than 1.5m with 100mm laps where lengths join. Lead moves with heat; longer pieces crack or pull out. Our lead code numbers page explains which thickness goes where: Code 3 is normal for soakers, Code 4 for step and cover flashings.
The flashing only protects the junction. It does not stop rain that soaks into the wall above it from running down inside, which is what a cavity tray is for.
The four usual causes
1. The cover flashing has come out of the wall
The most common fault and the easiest to see. Over time the mortar holding the lead in its joint cracks and falls out. Then wind lifts the lead, rain runs behind it, and it drips into the room below.
Signs: from the ground or a ladder, gaps along the top edge of the lead, lead standing proud of the wall, missing pointing, or a line of sealant where someone has tried to glue it back. Leaks that come and go with windy rain point here.
The fix: rake out the joint, re-wedge the lead and repoint it with mortar. Mastic along the top is a short-term patch, not a repair. If the flashing is one long strip, it should be replaced in shorter lengths.
2. Soakers missing, too short or split
On plain tiles and slates, the soakers do most of the work. If they were left out, are too narrow for the pitch, or have split, water gets under the flashing and down beside the wall. You cannot see soakers without lifting the tiles beside the wall.
Signs: a wet line running down the ceiling or the rafter right against the wall, worse in heavy rain, while the flashing looks fine from outside.
The fix: strip the tiles or slates next to the wall, fit new soakers to every course, and re-dress the flashing over them. On a small lean-to this is a day’s work for a roofer.
3. No cavity tray in the wall above
This is the one that keeps leaking after the lead has been replaced twice. In a cavity wall, rain that soaks into the outer leaf runs down the inside face of the brickwork. Where a roof is built against the wall, that water reaches the roof and has nowhere to go but in, unless a cavity tray catches it and sends it outside above the flashing. NHBC Standards expect stepped cavity trays where a pitched roof over an enclosed space meets a cavity wall, linked to the flashing, with a weep hole at the lowest tray.
Older extensions and many self-built lean-tos were put up without them. A solid wall (most pre-1930s houses) has no cavity, so this cause does not apply; there, porous brick (cause 4) does the same damage.
Signs: the leak appears below the junction even in rain that is not wind-driven, carries on for a day or more after the rain stops, and keeps going after the flashing has been redone. Look for weep holes just above the flashing line; if there are none, there is probably no tray.
The fix: cut in stepped cavity trays, a few bricks at a time, above the roof line. It is a bricklayer’s job as much as a roofer’s and costs more than new lead, but it is the only cure.
4. Porous brick, cracked render or render over the lead
Sometimes water goes straight through the wall above. Soft old bricks, perished mortar joints and cracked render all let rain in, and on a solid wall it comes out right where the roof meets it.
Render has its own trap. If render has been taken down over the top of the flashing, or right down to the tiles, it bridges the junction. Water gets behind the render, runs down and is delivered under the lead. Render should stop above the flashing on a bell-cast bead, with the lead tucked into the brickwork below.
Signs: damp patches on the inside of the wall itself, above ceiling level, cracks in the render, dark wet brick after rain, or render running down onto the roof.
The fix: repoint or replace failed brickwork, repair the render and cut it back clear of the flashing. A breathable masonry water repellent can help on porous brick, but only once the pointing is sound.
Mortar fillets: the old way
Many older lean-tos and outhouses have no lead at all, just a sloping fillet of mortar between the tiles and the wall. Mortar is rigid and the roof moves, so fillets crack and come away from the wall. Patching a fillet buys a winter or two. The lasting repair is soakers and step flashing in lead, or a lead-free alternative of the right type; our page on lead flashing alternatives compares them.
How to find which one you have
- Note the weather. Wind-driven rain on that wall points to flashing (1) or porous brick (4). Steady rain in any direction, and leaks that last after it stops, point to the cavity (3) or soakers (2).
- Look from the ground with binoculars. Check the pointing along the top of the lead, whether the lead is lifting, and whether there are weep holes just above it.
- Look from inside. In the roof space or behind a ceiling hatch, find the wet timber. Wet only right against the wall suggests soakers; a wet wall face above the roof line suggests the wall itself or a missing tray.
- Hose test, low to high. On a dry day, run a hose on the roof below the flashing first, then on the flashing, then on the wall above it, a few minutes each, with someone watching inside. Stop when the drip starts. Our how to find a roof leak guide covers this in more detail.
What it costs
Re-wedging and repointing a loose length of step flashing sits at the bottom of the range; new soakers and flashing along a whole wall cost more because the tiles have to come off. Our roof flashing repair cost page puts roof-to-wall flashing repairs at roughly £200 to £700, with scaffolding on top where it is needed. Cavity trays and render repairs are priced separately, usually by a bricklayer or builder. If the lean-to roof itself is past saving, see our lean-to and conservatory roof replacement guide, and our lead flashing and leadwork guide covers what good leadwork looks like.
When you get quotes, ask the roofer which of the four causes they think it is, and why. A roofer who quotes for new lead without checking for a cavity tray or looking at the wall above may be fixing the wrong thing.
Frequently asked questions
Why is my roof leaking where it meets the wall? Usually because the flashing has come out of its mortar joint, the soakers under the tiles are missing or short, there is no cavity tray in the wall above, or the brick or render above is letting water through. Wind-driven rain points to the first and last; steady leaks that last after rain points to the middle two.
Can I just seal the flashing with mastic? Only as a stopgap. Sealant along the top of the lead fails within a few years in sun and frost. The proper fix is to rake out the joint, re-wedge the lead and repoint with mortar.
How do I know if there is a cavity tray? Look for small weep holes in the brickwork just above the flashing line. No weep holes usually means no tray. A roofer or builder can confirm by taking out a brick.
Who do I call, a roofer or a builder? A roofer for flashing and soakers. If the cause is a missing cavity tray or failed brick and render, you need a bricklayer or builder as well. Some roofing firms do both.
How far should lead flashing go into the wall? At least 25mm into the mortar joint, held with lead wedges no more than 450mm apart, then pointed. Lengths should be no more than 1.5m with 100mm laps.
Does a lean-to roof need a cavity tray? If it covers an enclosed room and abuts a cavity wall, yes. NHBC Standards expect stepped cavity trays at that junction. An open car port or open porch can do without.
Want costs like this each month?
Join the Roofline brief for current UK prices and quote-reading tips.
More from Professional Roofers
How Much Does a New Roof Cost in the UK in 2026?
What a new roof really costs in the UK in 2026, broken down by house size, material and the hidden extras, plus how to check you are being quoted fairly.
Chimney Repointing and Repair Cost UK (2026)
What chimney repointing cost is in the UK in 2026, why scaffolding drives the price, and how repointing compares to rebuilding, flashing and pot repairs.
Roof Inspection and Survey Cost UK: What's Checked and the Price
Roof inspection cost UK 2026: what a ground, ladder or drone survey checks, typical prices for each, and when a written roof report is worth paying for.