Dormer Leaking at the Side? The 6 Places to Check First
By the Professional Roofers team
Updated 2026 · Independent cost guide
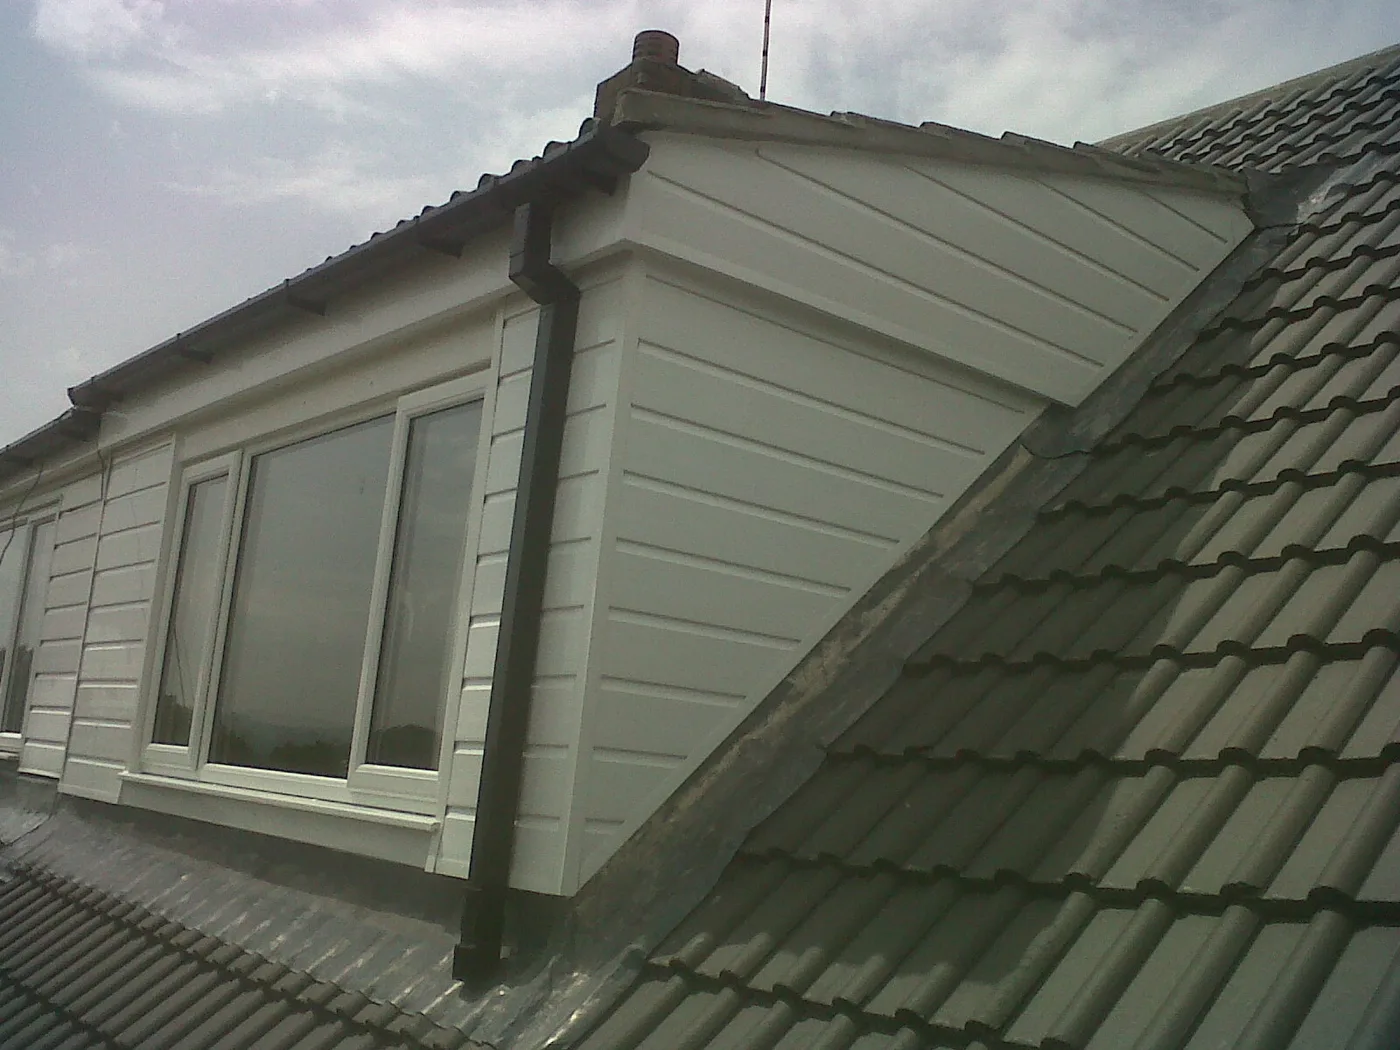
A dormer leaking at the side is almost always leaking at its cheek, the triangular or rectangular side wall that rises out of the roof slope. The cheek meets the main roof along a sloping line of tiles or slates, and that junction is the hardest part of any dormer to keep watertight. Lead-work specialists put it bluntly: most leaks blamed on a dormer start on the cheeks. The flat roof on top gets the blame because it looks vulnerable, but water that shows up at the side of a dormer ceiling usually came in lower down and further along.
This page covers how dormer cheeks are built, the six places water gets in, the order to check them, and why the stain on your ceiling is often a metre away from the actual fault.
How a dormer cheek is supposed to keep water out
Where the main roof tiles meet the cheek wall, there is a gap that rain would run straight into if nothing covered it. The standard UK answer is the same as at the side of a chimney:
- Soakers. Small folded pieces of lead (or sometimes aluminium on newer work), one slipped under every course of tiles or slates along the cheek. Each has a flat part that sits under the tile and an upstand that turns up against the cheek. Water that gets past the tiles runs across the soaker and back onto the roof below.
- A cover over the soakers. The upstands are then covered so that rain running down the cheek cannot get behind them. On a tile-hung cheek, the bottom course of hung tiles laps over the upstands. On a lead-clad cheek, the cladding itself or a separate cover flashing does the job. On a rendered or boarded cheek, a stepped or straight lead cover flashing is fixed over them.
Plain tiles and slates are laid double-lap, so one soaker per course is the only way to keep every joint covered. Interlocking concrete tiles are sometimes detailed with a single continuous lead flashing instead, dressed over the tile profile. Both work when done properly; both fail in predictable ways when they are not.
The six places water gets in
1. Missing, short or too few soakers
The single most common cause. On some loft conversions the soakers were left out altogether, or one was used every two or three courses to save time and lead. Others are simply too short: the Lead Sheet Training Academy’s rule of thumb is that a soaker’s length equals the tile gauge plus the lap plus 25mm, so that it reaches from one course to the next with overlap. Anything less leaves a gap at every course, and driven rain finds it.
You cannot see soakers from outside, because they are hidden under the tiles. A roofer lifts a few tiles at the cheek to check, which is quick and non-destructive.
2. A mortar fillet instead of lead
Older dormers, and some cheap modern ones, rely on a sand and cement fillet along the cheek instead of soakers and flashings. Mortar shrinks, the timber cheek moves, and within a few years there is a hairline crack all the way along. The fix is to rake it out and fit soakers and a proper cover, not to fill the crack.
3. Tile-hung cheeks that have slipped
On tile-hung cheeks, each vertical tile is nailed to battens. When nails rust through, tiles slip, and the gap lets rain straight onto the battens and membrane behind. Look for a stepped line of tiles that no longer sits flush, or a tile lying in the gutter. The bottom row matters most, because it is the one covering the soaker upstands.
4. Split or poorly fixed lead cladding
A lead-clad cheek looks indestructible, but lead expands and contracts with every sunny day. Pieces that are too large for the thickness (code) used, or fixed too tightly, fatigue and crack, usually in a line near a fixing or along a fold. Look for hairline splits, lifted edges at welts and rolls, and white or dark streaking below a crack. Our lead flashing and leadwork guide explains the codes and why sizing matters.
5. Where the dormer roof meets the cheek, and the cheek meets the main roof at the top
At the top of the cheek, the dormer’s own roof, often a flat felt, GRP or single-ply roof, finishes at a trim or upstand. Cracked sealant, a lifted trim or felt that stops short of the edge lets water run behind the cheek cladding and down inside it. On pitched dormers, the valleys where the dormer roof meets the main slope are another entry point; see our roof valley types compared page.
6. Missing cavity trays where a cheek meets masonry
This one is specific to dormers that run up to a party wall, a raised gable or a brick parapet, which is common on terraced loft conversions. Where a flat dormer roof or a cheek flashing is chased into a cavity wall, water that soaks into the outer brick can run down inside the cavity and come out below the flashing. A cavity tray built into the wall above the flashing catches it and turns it out. Without one, the flashing can be perfect and the room still gets wet, usually in wet, windy weather and hours after the rain started. The fix involves cutting out brickwork, so it is a job for a roofer and a bricklayer together.
Why the stain is a metre away
Water rarely drops straight down. Once it gets past the cheek, it runs along the top of a membrane, down a rafter or across the top of the insulation until it reaches a low point, a nail or a joint in the plasterboard. On a dormer, the internal cheek wall and ceiling are usually plasterboard fixed straight to the timber, so water can travel along the inside of the cheek and appear on the dormer ceiling near the window, or on the landing below, well away from the fault. Our guide on how to find a roof leak covers tracing it back from inside.
A rule that helps: a leak at the cheek-to-roof junction tends to show low on the side wall of the dormer or at the eaves end of the room. A leak from the dormer’s own flat roof tends to show on the dormer ceiling. A leak that only appears in wind-driven rain from one direction points at the cheek facing that way.
The order to check, from cheapest to most involved
- From the ground, with binoculars: slipped hung tiles, a tile in the gutter, cracked mortar fillets, lifted lead edges, and the state of the dormer roof trim.
- From inside: find the highest wet point in the eaves space beside the cheek if you can reach it, and note which weather makes it worse.
- A controlled hose test: starting low and working upwards, wet one area at a time for ten to fifteen minutes while someone watches inside. Start with the cheek-to-roof junction, then the cheek face, then the top of the cheek, then the dormer roof. Stop when it shows.
- Lifting tiles at the cheek: a roofer checks for soakers, their length and whether there is one per course.
- Opening up masonry: only if the evidence points at a cavity tray.
Do the ladder and roof work yourself only if you are trained and equipped for it. Dormer cheeks are high, often on the back of a terrace, and a fall from them is serious.
What it costs to fix
The fix is usually small if the fault is local: refixing hung tiles, replacing a cracked fillet with soakers and a cover flashing, or re-dressing lifted lead. It grows if the soakers were never fitted along the whole cheek, because every course needs lifting. Our roof leak repair cost and roof flashing repair cost pages give current UK price ranges, and our dormer roof cost page covers re-roofing a dormer outright.
Frequently asked questions
Why is my dormer leaking at the side? Usually because the junction where the dormer cheek meets the main roof is letting water past: missing or short lead soakers, a cracked mortar fillet, slipped tile hanging or split lead cladding. The dormer’s flat roof is a less common cause than it looks.
What are soakers on a dormer? Small folded pieces of lead fitted under each course of tiles or slates where the roof meets the dormer cheek. Each one turns up against the cheek and is covered by the cheek cladding or a flashing, so water runs back out onto the roof.
Can I seal a leaking dormer cheek with silicone or flashing tape? Only as a short-term measure. Sealants fail quickly on lead and tiles as they move, and they can trap water. A lasting repair means fitting the soakers and cover that should be there.
Why does my dormer only leak in heavy wind? Wind-driven rain gets under tiles and behind cladding that stays dry in normal rain. It points at the cheek facing the wind, or at a missing cavity tray if the dormer abuts a brick wall.
Why is the leak on the dormer ceiling if the problem is the cheek? Water travels along timbers, membranes and the back of plasterboard before it drips, so a stain can appear a metre or more from where the water entered.
Is a leaking dormer covered by my home insurance? Sudden storm damage often is; gradual leaks from wear or poor workmanship usually are not. If the dormer is recent, check any builder’s warranty or loft conversion guarantee first.
Sources
- Lead Sheet Training Academy: soaker and abutment detailing for rolled lead sheet.
- Lead-work specialists’ guidance on dormer cheeks and soakers (The Lead Lads, squote knowledge base).
Want costs like this each month?
Join the Roofline brief for current UK prices and quote-reading tips.
More from Professional Roofers

How Much Does a New Roof Cost in the UK in 2026?
What a new roof really costs in the UK in 2026, broken down by house size, material and the hidden extras, plus how to check you are being quoted fairly.
Chimney Repointing and Repair Cost UK (2026)
What chimney repointing cost is in the UK in 2026, why scaffolding drives the price, and how repointing compares to rebuilding, flashing and pot repairs.
Roof Inspection and Survey Cost UK: What's Checked and the Price
Roof inspection cost UK 2026: what a ground, ladder or drone survey checks, typical prices for each, and when a written roof report is worth paying for.